
Say Goodbye to Image Noise: How to enhance old images with SCUNet GAN
An accessible guide to using the Swin-Conv-UNet model for image denoising
We've all faced the problem of noisy images, whether it's due to low light conditions or an old camera. What if I told you there's an AI model that can remove noise from images, making them clearer and more visually appealing? In this guide, we'll explore the SCUNet GAN model, ranked 145th on Replicate Codex. We'll also see how we can use Replicate Codex to find similar models and decide which one we like. Let's begin.
 Mike Young
About the SCUNet Model
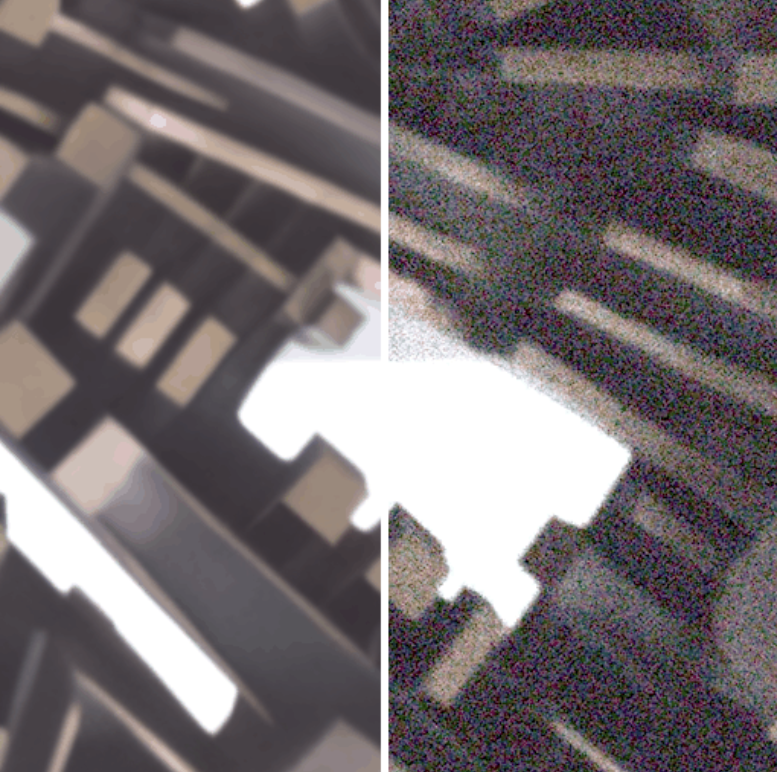
SCUNet, or Swin-Conv-UNet, is a denoising network designed to remove noise from images while preserving the original details. It uses the Swin Transformer block as the main building block of a UNet backbone. The architecture allows SCUNet to effectively process and denoise images, providing visually pleasing results.
The model was created by cszn and is based on a new data synthesis pipeline for real image denoising. By utilizing this pipeline, the model can generate paired noisy/clean training patches, which are then used to train the deep blind denoising model. You can find more technical details in the research paper.
To use SCUNet, you can access the model on Replicate Codex through this link. The cost per run is $0.00385, and it takes about 7 seconds on average to complete a run.
How the SCUNet Model Works
The SCUNet model is a denoising network designed to tackle real-world image denoising problems. To understand how the SCUNet model works, let's break it down into its key components and architectural features.
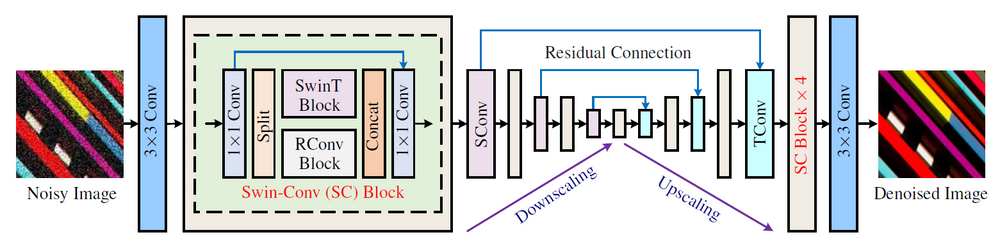
Swin-Conv Block
At the heart of the SCUNet model lies the Swin-Conv (SC) block. The SC block serves as the main building block of the UNet backbone. In each SC block, the input first passes through a 1×1 convolution. The input is then split evenly into two feature map groups. Each group is fed into a Swin Transformer (SwinT) block and a residual 3×3 convolutional (RConv) block, respectively. After that, the outputs of the SwinT block and RConv block are concatenated and passed through a 1×1 convolution to produce the residual of the input.
UNet Backbone
The SCUNet model's architecture is based on the UNet backbone. UNet is a popular architecture in the field of image segmentation and restoration, as it effectively captures both high-level semantic information and low-level spatial information. The UNet backbone consists of an encoder (downsampling) path and a decoder (upsampling) path connected by skip connections, which helps the model to learn better features for image denoising.
Data Synthesis Pipeline
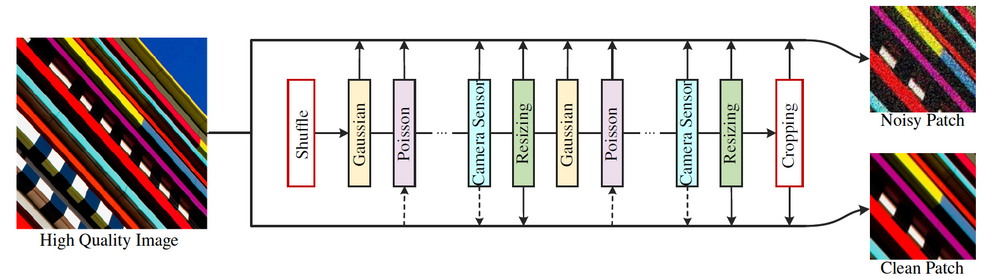
One of the significant challenges in training a denoising model is obtaining high-quality training data. SCUNet addresses this issue with a new data synthesis pipeline for real image denoising. This pipeline creates paired noisy/clean training patches from high-quality images by applying a randomly shuffled degradation sequence. This includes resizing and reverse-forward tone mapping operations to produce corresponding clean images. The paired noisy/clean patches are then used to train the deep blind denoising model.
Real Image Denoising
SCUNet is designed for real image denoising, meaning it can handle a wide range of noise types and levels in real-world images. The model can be trained for various noise levels, and users can choose the appropriate model based on their specific needs. This flexibility makes the SCUNet model a powerful tool for image denoising tasks.
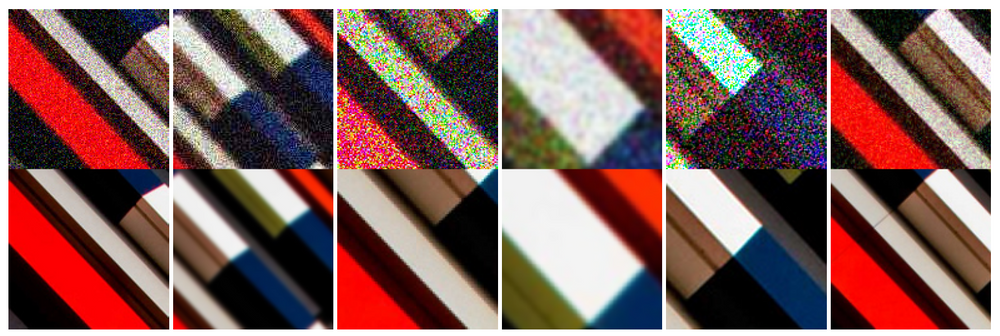
In summary, the SCUNet model combines the strengths of the Swin-Conv block, UNet backbone, and a data synthesis pipeline to deliver impressive denoising capabilities. Its flexibility in handling various noise levels and its adaptability to real-world images make it an ideal choice for a wide range of image-denoising applications.
Understanding the Inputs and Outputs of the SCUNet GAN Model
Inputs
SCUNet requires an image file as input. Additionally, you can choose a model variant based on the desired noise level and color mode (grayscale or color). The model_name parameter has the following allowed values:
- real image denoising
- grayscale images-15
- grayscale images-25
- grayscale images-50
- color images-15
- color images-25
- color images-50
By default, the model uses "real image denoising." The numbers (15, 25, etc.) correspond to the added noise level.
Outputs
SCUNet generates two outputs:
- Denoised Image: The cleaned-up image with reduced noise.
- Image With Added Noise: The input image with added noise (only applicable when using a noise level model variant).
The output schema on Replicate is a JSON object that looks like this:
{
  "type": "object",
  "title": "Output",
  "properties": {
    "denoised_image": {
      "type": "string",
      "title": "Denoised Image",
      "format": "uri"
    },
    "image_with_added_noise": {
      "type": "string",
      "title": "Image With Added Noise",
      "format": "uri"
    }
  }
}
Now that we have a grasp of the model's inputs and outputs, let's dive into using SCUNet for image denoising.
Note: you may also find this write-up on a similar model called GFPGAN interesting.
 Mike Young
A Step-by-Step Guide to Using SCUNet for Image Denoising
If you prefer using a graphical user interface, you can interact directly with SCUNet's demo on Replicate via their UI. Just follow this link and try it out!
For those looking to build a tool on top of SCUNet, follow these simple steps to denoise images using the model on Replicate. Make sure you have a Replicate account and API key ready.
Step 1: Install the Node.js Client
Install the Node.js client and authenticate with your API token:
npm install replicateThen, supply your API key:
export REPLICATE_API_TOKEN=[token]
Step 2: Run the Model
Run the model using the following code:
import Replicate from "replicate";

const replicate = new Replicate({
  auth: process.env.REPLICATE_API_TOKEN,
});

const output = await replicate.run(
  "cszn/scunet:df9a3c1dbc6c1f7f4c2d244f68dffa2699a169cf5e701e0d6a009bf6ff507f26",
  {
    input: {
      image: "...",
      model_name: "real image denoising",
    },
  }
);
Feel free to replace the model_name with other options based on your requirements. Your response will be returned in the format described above.
Taking it Further - Finding Other Image-to-Image Models with Replicate Codex
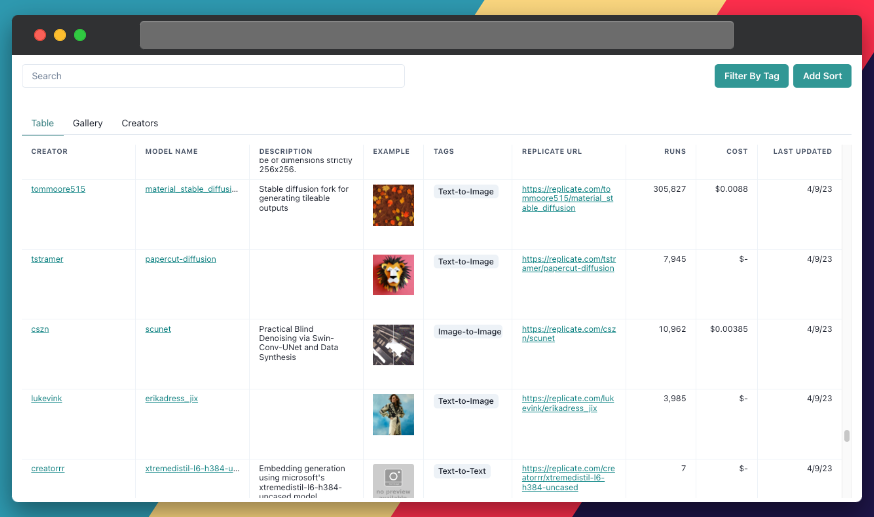
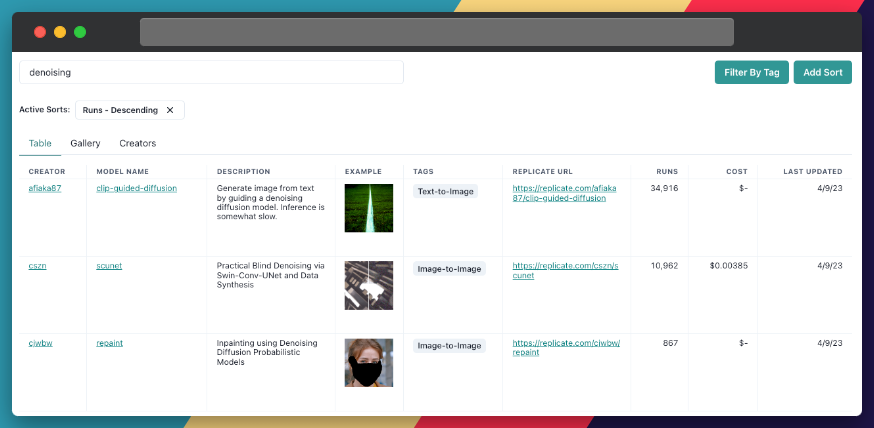
Replicate Codex is a fantastic resource for discovering AI models that cater to various creative needs, including image generation, image-to-image conversion, and much more. It's a fully searchable, filterable, tagged database of all the models on Replicate, allowing you to compare models and sort by price or explore by the creator. It's free, and it also has a digest email that will alert you when new models come out so you can try them.
If you're interested in finding similar models to SCUNet...
Step 1: Visit Replicate Codex
Head over to Replicate Codex to begin your search for similar models.
Step 2: Use the Search Bar
Use the search bar at the top of the page to search for models with specific keywords, such as "image restoration," "denoising," or "image enhancement." This will show you a list of models related to your search query.
Step 3: Filter the Results
On the left side of the search results page, you'll find several filters that can help you narrow down the list of models. You can filter and sort by model type (Image-to-Image, Text-to-Image, etc.), cost, popularity, or even specific creators.
By applying these filters, you can find the models that best suit your specific needs and preferences. For example, if you're looking for an image restoration model that's the most popular, you can just search and then sort by runs. In this case, it looks like "clip-guided-diffusion" is a more popular model than the SCUNet GAN model, so that might be one to try out!
Conclusion
In this guide, we explored the SCUNet model and learned how to use it for image denoising. We also discussed how to leverage the search and filter features in Replicate Codex to find similar models and compare their outputs, allowing us to broaden our horizons in the world of AI-powered image enhancement and restoration.
I hope this guide has inspired you to explore the creative possibilities of AI and bring your imagination to life. Don't forget to subscribe for more tutorials, updates on new and improved AI models, and a wealth of inspiration for your next creative project. Happy image enhancing and exploring the world of AI with Replicate Codex!
Subscribe or follow me on Twitter for more content like this!

Comments ()