
Breathe New Life into Old Photos with AI: A Beginner's Guide to GFPGAN
Are you ready to explore the magic of AI in photo restoration? Let's get started!
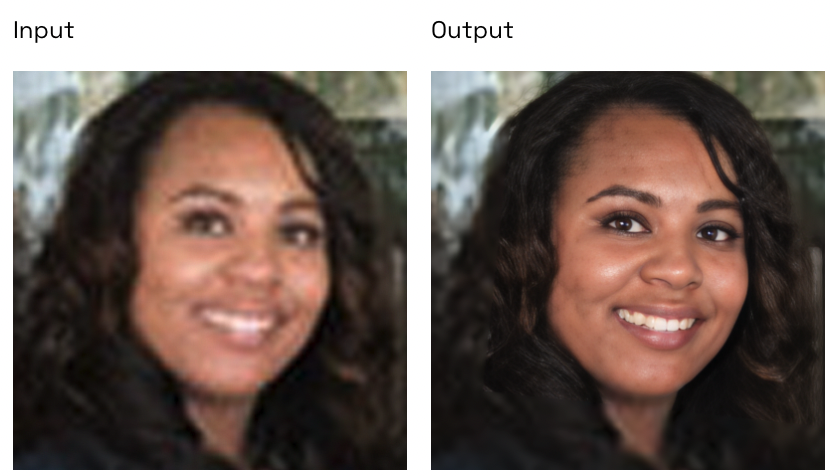
Ever wished you could restore your treasured old photos or AI-generated faces to their former glory with just a few clicks? Look no further! We're about to introduce you to the fascinating world of AI-powered image restoration using GFPGAN, a practical face restoration algorithm for old photos created by TencentARC.
In this beginner-friendly guide, we'll walk you through how to use GFPGAN, an AI model designed to restore old photos or AI-generated faces. This model is currently ranked #3 on AIModels.fyi!
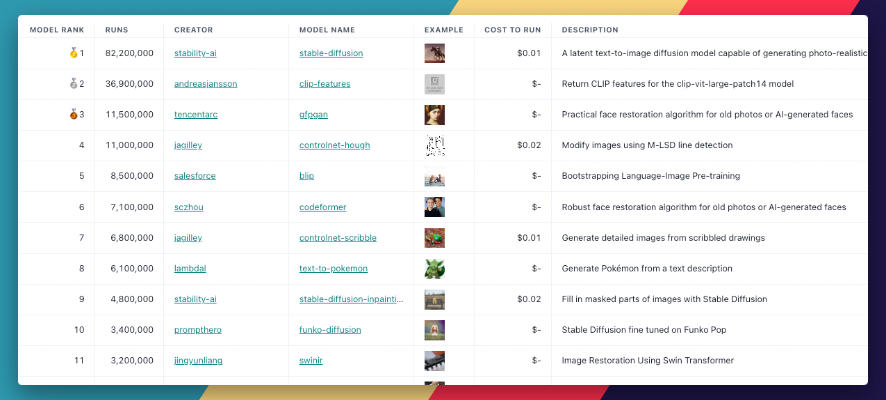
GFPGAN is ranked #3 on our leaderboard at the time of this writing. We'll learn how to interact with the model via Replicate's UI and via Python, and understand how it works and how we can tweak it to fit our needs.
We'll also see how we can use Replicate Codex to find similar models and decide which one we like. Let's begin.
 Mike Young
About the GFPGAN Model
GFPGAN is an AI model developed by TencentARC that specializes in practical face restoration for old photos or AI-generated faces. With over 11.5 million runs, this AI model has gained popularity among photography enthusiasts and digital artists alike. It's the 3rd-most popular model on Replicate and costs about $0.011 per run on replicate.
You can learn more about the model and its creator by visiting the AIModels.fyi page. It's also open source and you can run it on your own computer.
Now that we're familiar with the model, let's dive into the step-by-step guide on how to interact with the GFPGAN API on Replicate. First, we'll take a look at the model inputs and outputs and what they mean.
Understanding the Inputs and Outputs of the GFPGAN Model
Before diving into the details, let's take a closer look at the various inputs and outputs of the GFPGAN model and understand their acceptable values. We'll also explore different scenarios where you might want to change these values.
Inputs
- img (file): This is the image file you provide to the model for restoration. You can upload any old photo or AI-generated face that you'd like to restore.
- version (string): This input specifies the GFPGAN version to use. You can choose between
v1.2,v1.3,v1.4, orRestoreFormer. The default value isv1.4. Versionv1.3offers better quality, whilev1.4provides more details and better identity preservation. You can experiment with different versions to find the best fit for your needs. - scale (number): This input controls the rescaling factor. The default value is 2. You can adjust this value based on your desired level of image enlargement or reduction.
Outputs
The output of the GFPGAN model is an image URI. The image will be a restored version of the input photo, generated based on the input parameters you provided.
The output schema for the model is as follows:
{
  "type": "string",
  "title": "Output",
  "format": "uri"
}
Now that you have a better understanding of the inputs and outputs of the GFPGAN model, you can more effectively fine-tune the parameters to restore and enhance your images to your liking!
Step-by-Step Guide to Restore and Enhance Your Images
If you're not up for coding, you can interact directly with this model's "demo" on Replicate via their UI. You can use this link to interact directly with the interface and try it out! This is a nice way to play with the model's parameters and get some quick feedback and validation.
If you're more technical and looking to eventually build a cool tool on top of this model, you can follow these simple steps to restore and enhance your images using the GFPGAN model on Replicate.
Step 1: Install the Replicate Python Client
First, you'll need to install the Replicate Python client from PyPI. Run the command below to install the client:
pip install replicateStep 2: Set up API Token
Copy your API token and authenticate by setting it as an environment variable:
export REPLICATE_API_TOKEN=[token]
If you can't find your API token, you can access it by clicking on the "Account" tab in the top right of any page on the Replicate site.
Step 3: Run the Model with Your Inputs
Now, you're ready to run the model using just a few lines of code:
import replicate

model = replicate.models.get("tencentarc/gfpgan")
version = model.versions.get("9283608cc6b7be6b65a8e44983db012355fde4132009bf99d976b2f0896856a3")

inputs = {
    'img': open("path/to/file", "rb"),
    'version': "v1.4",
    'scale': 2,
}

output = version.predict(**inputs)
print(output)
Replace the path in the img input with the path to your image file, and you're good to go! The result will be available at the "URI" in the output. You can see an example of the input and output I got in the image below.

Taking it further - finding other image restoration models with Replicate Codex
AIModels.fyi is a fantastic resource for discovering AI models that cater to various creative needs, including image generation, image-to-image conversion, and much more. It's a fully searchable, filterable, tagged database of all the models on replicate, and also allows you to compare models and sort by price or explore by the creator. It's free, and it also has a digest email that will alert you when new models come out so you can try them.
If you're interested in finding similar models to the GFPGAN model and comparing their outputs, you can use the powerful search and filter features in Replicate Codex. Here's a quick guide on how to do that:
Step 1: Visit Replicate Codex
Head over to AIModels.fyi to begin your search for similar models.
Step 2: Use the Search Bar
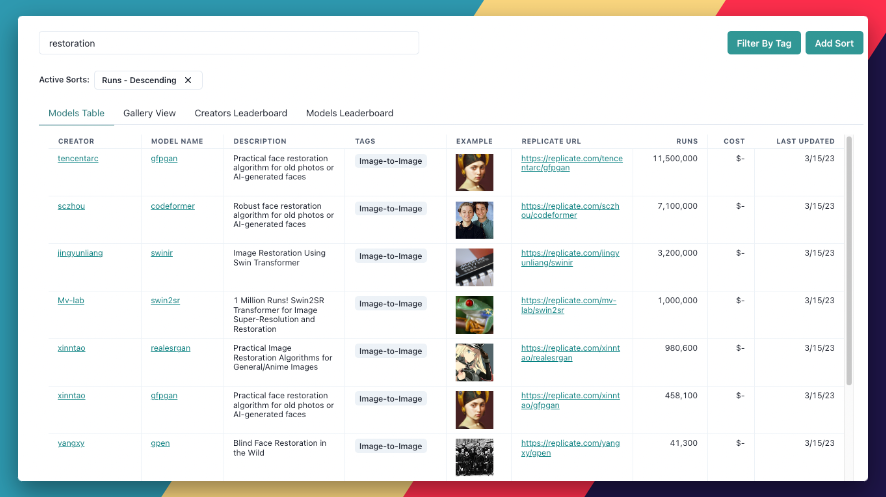
Use the search bar at the top of the page to search for models with specific keywords, such as "image restoration," "face enhancement," or "super-resolution." This will show you a list of models related to your search query.
Step 3: Filter the Results
On the left side of the search results page, you'll find several filters that can help you narrow down the list of models. You can filter and sort by models by type (Image-to-Image, Text-to-Image, etc.), cost, popularity, or even specific creators.
By applying these filters, you can find the models that best suit your specific needs and preferences. For example, if you're looking for an image restoration model that's the next most popular, you can just search and then sort by cost.
Step 4: Explore and Compare Models
Once you have a list of models that match your search criteria and filters, you can click on each model to view more details about them. This includes a description of the model, its inputs and outputs, an example of the code to use the model, and more.
You can also compare the models' performance, pricing, and features to find the one that best fits your needs. Some models may have a higher resolution output, while others might focus more on preserving details or improving color accuracy. By comparing different models, you can choose the one that aligns with your requirements and expectations.
Step 5: Test and Integrate the Model
Once you've found a model that you think will work well for your use case, you can test it using the provided example code or by interacting with a demo on the model's Replicate page. This will give you a better understanding of the model's performance and whether it meets your expectations.
Conclusion
In this beginner-friendly guide, we embarked on a creative journey to enhance and restore images using the GFPGAN AI model on Replicate. Along the way, we learned about the fantastic resource that is Replicate Codex and how it can help us explore and discover a vast array of AI models available on Replicate. We also delved into the details of the GFPGAN model, understanding the inputs and outputs and how to fine-tune them to achieve our desired results.
We also discussed how to leverage the search and filter features in Replicate Codex to find similar models and compare their outputs, allowing us to broaden our horizons in the world of AI-powered image enhancement and restoration.
I hope this guide has inspired you to explore the creative possibilities of AI and bring your imagination to life. Don't forget to subscribe for more tutorials, updates on new and improved AI models, and a wealth of inspiration for your next creative project. Happy image enhancing and exploring the world of AI with Replicate Codex!
Subscribe or follow me on Twitter for more content like this!


Comments ()