
Cleaning up AI-generated Images with CodeFormer: A Complete Guide
A hands-on journey through the world of AI image restoration with CodeFormer
Sometimes, AI-generated photos come out a little bit... wonky. Maybe they're low quality, or perhaps there are weird artifacts that make the image look less than perfect. But fear not! CodeFormer is here to save the day, helping you fix up those images in no time. In this guide, I'll introduce you to the CodeFormer model, show you how it works, and explain how to use it to fix up a slightly warped AI-generated photo. I'll walk you through the exact steps I used to clean up the weird image I got from another AI model, shown below:

This image came from the arcane-diffusion model, which I was using for another blog post. I'll show you how you can use the same workflow I followed to clean up your own generated images and even upscale them to look better. I'll do this walkthrough using the Replicate python SDK, but there are also many other languages supported on Replicate.
In this guide, I'll also show you how we can use Replicate Codex to find similar models and decide which one we like. Replicate Codex is a free community tool that lets you search, filter, sort, and compare AI models and find the right one for your AI project.
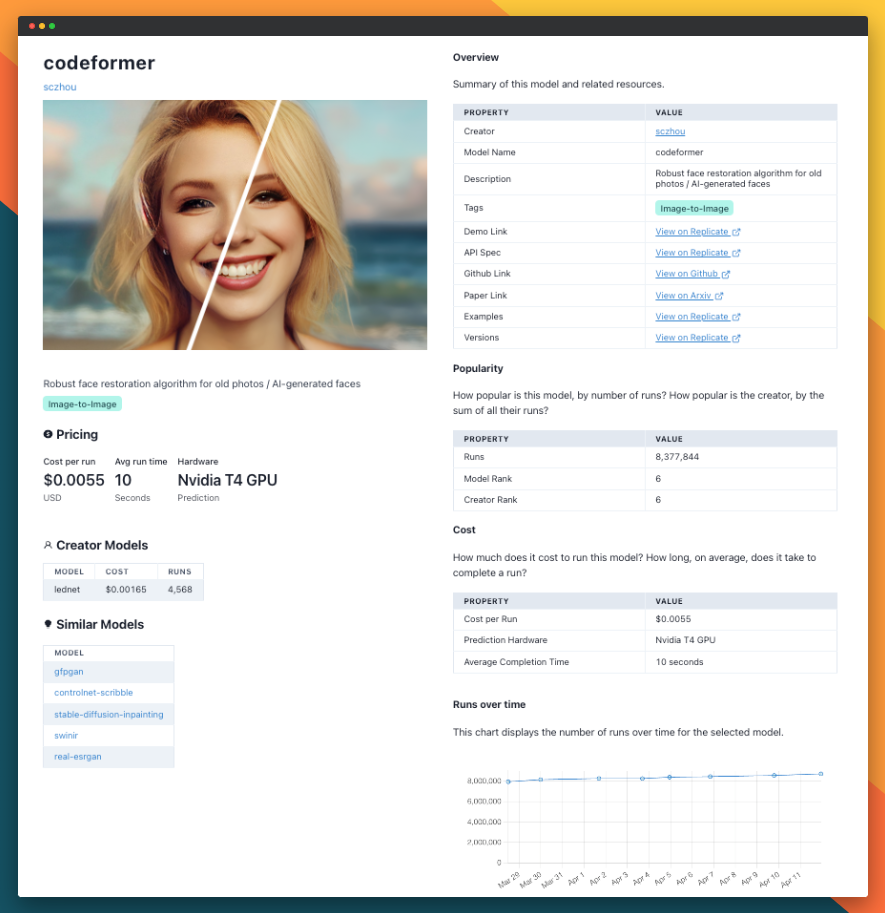
CodeFormer is ranked 6th on Replicate Codex. It's super popular, with over 8M runs. So, it's safe to say that the community really likes this tool - and that means you might like to use it too!
About CodeFormer
CodeFormer, created by sczhou, is a robust face restoration algorithm designed to work with both old photos and AI-generated faces. It's an Image-to-Image model that costs $0.0055 per run, with an average run time of 10 seconds on Nvidia T4 GPU hardware.
The underlying technology of CodeFormer is based on a Transformer-based prediction network, which models global composition and context for code prediction. This allows the model to discover natural faces that closely approximate the target faces, even when the inputs are severely degraded. A controllable feature transformation module is also included, which enables a flexible trade-off between fidelity and quality. You can read more about how CodeFormer works on Github.
Understanding the Inputs and Outputs of CodeFormer
Before we start working on this project, let's take a second to understand the inputs and outputs the model expects.
Inputs
image(file): The input image you want to fix.codeformer_fidelity(number): A balance between quality (lower number) and fidelity (higher number). Default value: 0.5.background_enhance(boolean): Whether to enhance the background image with Real-ESRGAN. Default value: false.face_upsample(boolean): Whether to upsample restored faces for high-resolution AI-created images. Default value: false.upscale(integer): The final upsampling scale of the image. Default value: 2.
Outputs
The output of the model is a URI string representing the fixed image. It's a JSON object and looks like the format below:
{
  "type": "string",
  "title": "Output",
  "format": "uri"
}
Now that we understand the inputs and outputs, let's dive into using CodeFormer to fix up a warped AI-generated photo.
A Step-by-Step Guide to Using CodeFormer
If you're not up for coding, you can interact directly with CodeFormer's "demo" on Replicate via their UI. You can use this link to interact directly with the interface and try it out! This is a nice way to play with the model's parameters and get some quick feedback and validation.
If you're more technical and looking to eventually build a cool tool on top of CodeFormer, you can follow these simple steps to restore and enhance your images using the model on Replicate.
Make sure you have a Replicate account and your API key handy!
Step 1: Install the Python client
This is pretty easy to do:
pip install replicateStep 2: Set up your API token
You can get this from Replicate in your account tab.
export REPLICATE_API_TOKEN=[token]
Step 3: Run the model
You just need a few lines of code to do this with the Replicate python SDK.
import replicate
output = replicate.run(
    "sczhou/codeformer:7de2ea26c616d5bf2245ad0d5e24f0ff9a6204578a5c876db53142edd9d2cd56",
    input={"image": open("path/to/file", "rb")}
)
print(output)
In this step, we import the replicate library and call the run function to execute the CodeFormer model with the provided input image. The output will be printed as a URI string representing the fixed image.
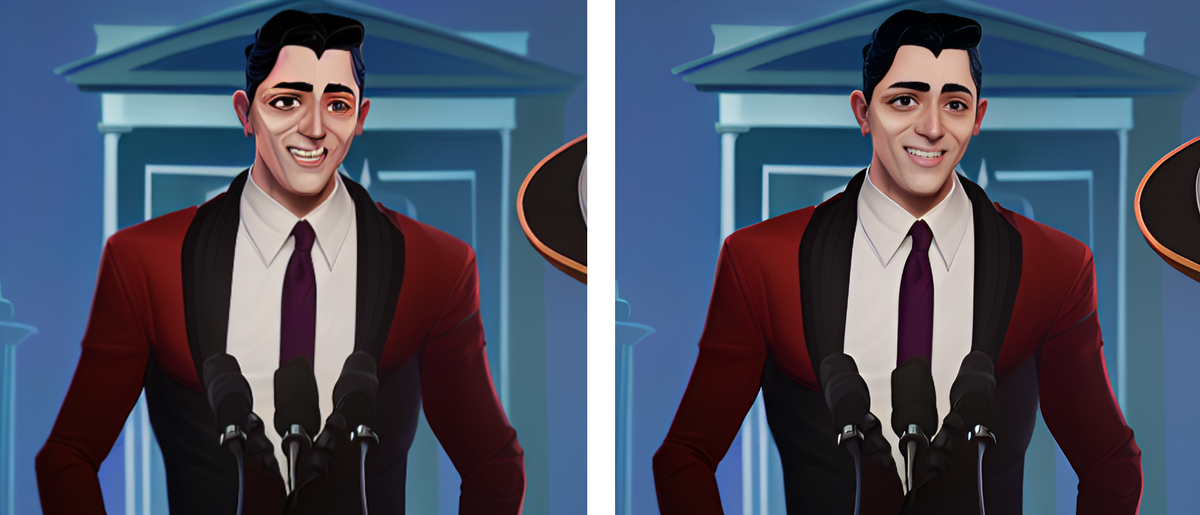
Here's the output image I got from this process, shown against the hideous input I started with. What an improvement!

Taking it Further - Finding Other Image Restoration Models with Replicate Codex
Replicate Codex is a fantastic resource for discovering AI models that cater to various creative needs, including image generation, image-to-image conversion, and much more. It's a fully searchable, filterable, tagged database of all the models on Replicate, and also allows you to compare models and sort by price or explore by the creator. It's free, and it also has a digest email that will alert you when new models come out so you can try them.
If you're interested in finding similar models to CodeFormer...
Step 1: Visit Replicate Codex
Head over to Replicate Codex to begin your search for similar models.
Step 2: Use the Search Bar
Use the search bar at the top of the page to search for models with specific keywords, such as "image restoration," "face enhancement," or "super-resolution." This will show you a list of models related to your search query.
Step 3: Filter the Results
On the right side of the search results page, you'll find several filters that can help you narrow down the list of models. You can filter and sort by models by type (Image-to-Image, Text-to-Image, etc.), cost, popularity, or even specific creators.
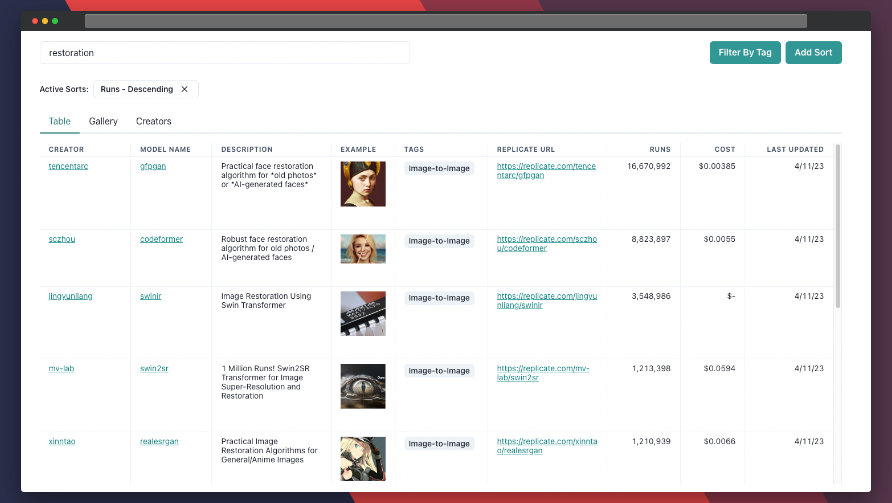
By applying these filters, you can find the models that best suit your specific needs and preferences. For example, if you're looking for an image restoration model that's the most popular, you can just search and then sort by the number of runs. In that case, you'll find the GFPGAN model, which I've also used to restore old photos - see my writeup here for more information. I've included an example restoration from GFPGAN below so you can get a sense of how it handles images too.

Conclusion
In this guide, we explored the CodeFormer model, learned about its inputs and outputs, and demonstrated how to use it to fix warped AI-generated photos. We also discussed how to leverage the search and filter features in Replicate Codex to find similar models and compare their outputs, allowing us to broaden our horizons in the world of AI-powered image enhancement and restoration.
I hope this guide has inspired you to explore the creative possibilities of AI and bring your imagination to life. Thanks for reading. Happy image enhancing and exploring the world of AI with Replicate Codex!
Subscribe or follow me on Twitter for more content like this!


Comments ()